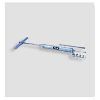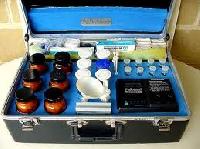
Soil Testing Kit
Get Price Quote
We are offering soil testing kit.testing proceduressoil testing kit testing soil sample collection and preparation: depending on the type of soil, divide the field in different sampling units. The soil sample collected should be representative of the area sampled. a good representative soil sample is the first requirement for a reliable soil testing. A field can be treated as a single sampling unit only if it is appreciably uniform in all respects. Separate sets of composit samples need to be taken for separate type areas. The sample should be taken in zigzag pattern. For field crops, sampling depth of 15-20 cms is desired. For pasture crop, a 10 cm. Depth is normally sufficient. Sampling tools : for sampling soft moist soil, spade or khurpi is quite satisfactory. for harddry soil, screw type auger is more convenient. sample collection: if the spade or khurpi is used, a v shaped cut may be first made up to plough layer and uniform 1.5 cm slice taken out. The collected soil sample should be thoroughly mixed on a clear piece of cloth, polythene sheet or thick paper and the bulk reduced by "quartering" so that about 500 gm. (12 kg.) of composite sample is retained. In 'quartering', the soil is spread uniformally over a sheet of brown paper or polythene and divided in to four equal square portions. Discard the two diagonally opposite squares while retaining the other two squares. Mix the retained soil sample and repeat the process of discarding until about 12 kg. Sample is balance. sample storage: the sample must be kept in cloth or polythene bag with suitable identification. sample preparation: it is preferable to air dry samples in shade. The samples may be mixed during drying to expose fresh surfaces. The dried samples are crushed gently using pestle & morter and sieved through 2 mm sieve. Pestle & morter may be of wood, porelaim or stainless steel. Sieve can be steel or nylon. Stones, pieces of roots or leaves etc. may be removed from the sample. The soil sample passed through 2 mm sieve may be used for analysis of n, p, k & ph. For analysis of organic carbon, small portion of soil sample is further ground, using pestle & morter, to make it a powder to pass through 0.5 mm sieve. ph colour comparator soil ph test contains a colour comparator, which has 10 slots ranging from ph value of 4.5 (highly acidic) to 9.0 (highly alkaline). phosphorous & nitrogen colour comparator the phosphorous & nitrogen test contains a colour comparator, which has 5 nos. Colour slots of blue red colour of varying intensity corresponding to the phosphorous nitrogen content in the soil sample. organic carbon colour comparator the organic carbon test contains colour comparator which has 6 nos. Colour slots ranging from 0 to 1.0 % organic carbon in soil sample. matching the colour for matching the colour of test water with the colours on the comparator, place the glass test bottle in the comparator. Hold the comparator against light, placing it between source of daylight and the observer, at his eye level. Observe the colour of test water. Match the colour of test bottle with colours on comp rator. read the phosphorousnitrogenorganic carbon content directly on the comparator. in case colour of test water falls between two colour slots on comparator, reading may be taken as the mid-point between the two colour slots. proper handling of chemicals 1. Carefully follow all instructions. 2. Some of the reagents contain strong acids. Handle these carefully. 3. Tighten all caps immediately after use. Do not exchange caps. 4. Avoid prolonged exposure to direct sunlight. 5. Keep reagents away from fire and heat. 6. Wash & rinse all apparatus immediately after use. Use bottle brush for cleaning of bottles, wherever necessary. 7. Keep away from reach of children. soil - ph test test procedure 1. Take reagent ph-1 in test bottle no. 1 up to 5 ml. Mark. 2. Add 2 flat spoonful of soil (2gm.) in test bottle no. 1 with the help of funnel. 3. Put cap and mix by gentle inversion for one minute. (do not shake vigorously. Mix for one minute only) allow the bottle to stand for 10 minutes. Soil will settle & separate to leave clear liquid layer on the top. 4. Place the bottle no. 1 in ph colour comparator and match the colour of top liquid layer with colours on the comparator. Read soil ph directly on comparator (refer note for method of colour matching). (for ease of matching colours, you may carefully decant the upper clear liquid from test bottle no. 1 to another clean test bottle no. 1 and then match the colour with ph colour chart.) available phosphorous (p) in soil test procedure 1. Take in test bottle no. 1, phosphorous reagent ap-1 up to 6 ml. Mark. 2. Using funnel, add one flat spoonful (1gm.) of soil in test bottle no. 1 3. Put cap and mix by gentle inversion for one minute. (do not shake vigorously. Mix for one minute only) allow the bottle to stand for 5 minutes. Soil will settle & separate to leave clear liquid layer on the top. 4. Carefully draw upper clear liquid in dropper and transfer the same to test bottle no. 2 to make level up to 3 ml. Mark. (do not pull up any soil in the dropper. To avoid agitation of soil, squeeze bulb of dropper before inserting its tip into liquid. Release bulb slowly to draw clear liquid.) 5. To 3ml. Liquid in bottle no. 2, add 6 drops of phosphorous reagent ap-2 and mix gently by swirling. Add 3 drops of reagent ap-3. Put cap and mix well. Blue colour will develop in bottle no. 2. 6. Place the bottle in phosphorous colour comparator & match the colour of bottle with the colours on phosphorous colour comparator. (refer the note regarding colour comparator) read the available phosphorous (as p) directly on the colour comparator. available nitrogen (n) in soil test procedure 1. Take in test bottle no. 1, nitrogen reagent an-1 up to 6 ml. Mark. 2. Using funnel, add one flat spoonful of soil (1gm.) in test bottle no. 1 3. Put cap and mix by gentle inversion for one minute. (do not shake vigorously. Mix for one minute only) allow the bottle to stand for 5 minutes. Soil will settle & separate to leave clear liquid layer on the top 4. In clean bottle no. 2, carefully transfer 2 ml of upper clear liquid from bootle no. 1, using dropper. (carefully draw liquid from bottle no. 1 in dropper. Do not pull up any soil in the dropper, while drawing liquid. To avoid agitation of soil, squeeze bulb of dropper before inserting tip into liquid. Release bulb slowly to draw clear liquid.) 5. To test bottle no. 2, add 4 drops of reagent an-2. & mix gently. 6. To test bootle no. 2, add 4 drops of reagent an-3, put cap & mix gently. Wait for 5 minutes. 7. After 5 minutes, mix gently & place the bottle in nitrogen colour comparator & match the colour of bottle with colours on comparator.(refer note regarding colour comparator.) 8. Read the available nitrogen directly on comparator. organic carbon in soil test procedure 1. Using 100mg. Spoon, take one spoonful (100mg.) of finely ground soil in test bottle no. 1. 2. to the bottle no. 1, add 0.5 ml. Of reagent oc-1 with the help of 1 ml.green coloured syringe (do not use red coloured syringe) 3. To the bottle no. 1, add 80 drops of reagent) oc-2 and mix by gentle swirling. (caution! reagent oc-2 is a strong acid. Handle carefully avoids contact.) put cap. Wait for 30 minutes. 4. add reagent oc-3 to make the level in bottle no. 1 up to 5 ml. Mark. Mix by gentle swirling. Allow the bottle to stand for 5 minutes. Soil will settle & separate to leave clear liquid layer on the top. 5. place the bottle in organic colour comparator and match the colour of top liquid layer with the colour slots on comparator by holding the comparator against day light. (please refer note regarding organic carbon colour comparator) 6. read the percentage organic - carbon in the soil (%) directly on the colour comparator. (for ease of matching colours, you may carefully decant the upper clear liquid from test bottle no. 1 to another clean test bottle no. 1 and then match the colour with colour comparator.) available potassium (k) in soil test procedure 1. Take in test bottle no. 1, potassium reagent ak-1 up to 6 ml. Mark. 2. Using funnel, add two flat spoonfuls (2gm.) of soil in test bottle no. 1 3. put cap and mix by gentle inversion for one minute. (do not shake vigorously. mix for one minute only) allow the bottle to stand for 5 minutes. Soil will settle & separate to leave clear liquid layer on the top. 4. Carefully draw upper liquid in dropper and transfer the same to another clean bottle no.2, to make level up to 2 ml. Mark. (do not pull up any soil in dropper. To avoid agitation of soil, squeeze bulb of dropper before inserting its tip in to liquid. Release bulb slowly to draw clear liquid in to the dropper.) 5. To 2 ml. Liquid in bottle no. 2, add one tablet of potassium reagent ak-2. Do not put cap. Mix by swirling. Allow tablet to dissolve completely. Mix by swirling intermittently to assist dissolution (it may take 5-6 minutes to dissolve the tablet completely) purple colour will develop in bottle no. 2. Proceed further only after complete dissolution of tablet. 6. Take potassium reagent ak-4 in the 1 ml syringe. Add reagent ak-4 to bottle no. 2, two drops at a time, and mix gently after each addition. Keep count of drops and continue addition until colour changes from purple to blue. Count the no. Of drops of reagent ak-4 required for colour change. use red coloured 1 ml. Syringe for taking potassium. Reagent ak-4. (do not use green coloured syringe)

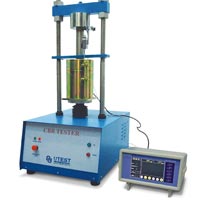
Proctor Compaction Apparatus
Get Price Quote
Humidity Temperature Controller, Altimeter
Best Deals from Soil Testing Equipment