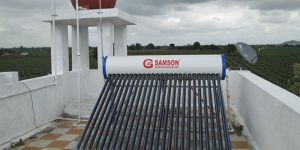
INSTALLATION
1. Handle carefully while transporting, unloading and lifting the system to the terrace.2. Install the system where it gets maximum sunlight.3. Assemble the mounting frame of the tank and/ or manifold such that the ETC tubes are facing towards South.4. Put the Hot water/ Manifold over the frame. Check whether the tank/ manifold holes are facing the holes of the Bottom Support Bracket.5. Put the Bottom Caps into the Bottom Support Holes.6. Put anti-dirt seal over the ETC Tubes.7. Apply some oil or soap water to the Silicon Rubber Grommets and to the end of the ETC Tubes as lubricant.8. Fix one ETC tube to each end of the Tank/ manifold by slowly screwing it into the tank.9. Push the ETC Tube down till it gets securely placed in the Bottom Cap.10. If the alignment is ok. Tighten the bolts under the tank to the frame.11. Now install all the remaining ETC Tubes.12. Connect the inlet-outlet pipes to the tank. Fix a non Return Valve (preferably horizontal) and a ball valve to the inlet pipe of the tank as shown in the figure. If it is a manifold system , connect the manifolds to the tank and connect inlet outlet pipes to the tank.13. Fill up the tank with cold water when the ETC Tubes are cold. Specially early morning before sun rise or after 10 O’clock at night. Check for any leakages. Sometimes, the Silicone Rubber Garmmets are displaced while inserting the ETC Tubes. If there is any leakage form the Anti-dirt seal, remove the tube, place the silicone rubber ring on its seat and reinsert the tube.
CAUTION
The empty system should never be filled with cold water in the afternoon or when the Tubes are hot. Either fill it up before 7 am in the morning or After 10 O’clock at night. Otherwise, the ETC Tubes are prone to crack due to temperatuere shock.
A box cooker has a transparent glass or plastic top, and it may have additional reflectors to concentrate sunlight into the box. The top can usually be removed to allow dark pots containing food to be placed inside. One or more reflectors of shiny metal or foil-lined material may be positioned to bounce extra light into the interior of the oven chamber. Cooking containers and the inside bottom of the cooker should be dark-colored or black. Inside walls should be reflective to reduce radiative heat loss and bounce the light towards the pots and the dark bottom, which is in contact with the pots. The box should have insulated sides. Thermal insulation for the solar box cooker must be able to withstand temperatures up to 150 °C (300 °F) without melting or out-gassing. Crumpled newspaper, wool, rags, dry grass, sheets of cardboard, etc. can be used to insulate the walls of the cooker. Metal pots and/or bottom trays can be darkened either with flat-black spray paint (one that is non-toxic when warmed), black tempera paint, or soot from a fire. The solar box cooker typically reaches a temperature of 150 °C (300 °F). This is not as hot as a standard oven, but still hot enough to cook food over a somewhat longer period of time.
A Solar Oven made of cardboard, newspapers, and reflective tape
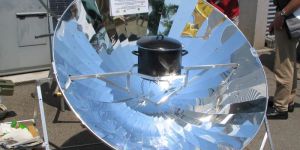
Panel solar cookers are inexpensive solar cookers that use reflective panels to direct sunlight to a cooking pot that is enclosed in a clear plastic bag.
A box cooker has a transparent glass or plastic top, and it may have additional reflectors to concentrate sunlight into the box. The top can usually be removed to allow dark pots containing food to be placed inside. One or more reflectors of shiny metal or foil-lined material may be positioned to bounce extra light into the interior of the oven chamber. Cooking containers and the inside bottom of the cooker should be dark-colored or black. Inside walls should be reflective to reduce radiative heat loss and bounce the light towards the pots and the dark bottom, which is in contact with the pots. The box should have insulated sides. Thermal insulation for the solar box cooker must be able to withstand temperatures up to 150 °C (300 °F) without melting or out-gassing. Crumpled newspaper, wool, rags, dry grass, sheets of cardboard, etc. can be used to insulate the walls of the cooker. Metal pots and/or bottom trays can be darkened either with flat-black spray paint (one that is non-toxic when warmed), black tempera paint, or soot from a fire. The solar box cooker typically reaches a temperature of 150 °C (300 °F). This is not as hot as a standard oven, but still hot enough to cook food over a somewhat longer period of time.
A Solar Oven made of cardboard, newspapers, and reflective tape
Panel solar cookers are inexpensive solar cookers that use reflective panels to direct sunlight to a cooking pot that is enclosed in a clear plastic bag.
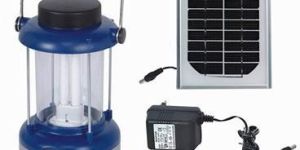
Secondary Business TypeManufacturer / Exporters / Wholesale Suppliers
Opening Hours
SUN : Closed
MON : 9:30 AM - 6:30 PM
TUE : 9:30 AM - 6:30 PM
WED : 9:30 AM - 6:30 PM
THU : 9:30 AM - 6:30 PM
FRI : 9:30 AM - 6:30 PM
SAT : 9:30 AM - 6:30 PM
Samson Solar Technology is one of the prime divisions of M/S. Green Field Material Handling Pvt. Ltd., an ISO 9001:2008, ISO 14001:2004, OSHAS 18001:2007 certified company & CE marked company is a pioneer in manufacturing and Exporter of SAMSON Brand Solar products other than Material Handling & Lifting Products, Agro Equipment, Bio Fertilizer products. Since 1996 SAMSON Solar Technology, a unit of Green Field Material handling Pvt. Ltd. has invested significant resources in building local presence and establishment in India. Company have very highly experienced engineers, manager, sales and service team for dealing quality solar products and it’s services for the specific market requirements in India as well as the highest level of technical support by its core engineering team in manufacturing and services. We have our Reg. office & Headquarters at Plot No. N-49/1, MIDC, Add. Ambernath Indl. Area , Ambernath (E), Thane – 421 506, Maharashtra, 55KM away from Mumbai Airport and 45KM from Thane City. Samson Solar Technology’s main expertise in designing and manufacturing high quality solar water heating systems and solar PV- systems which meets national and international standard.